-
Getting Started
-
App Portal
-
Features
-
cPGuard Lite
-
Command line
-
User plugin
- Articles coming soon
-
FAQs
- Reissue license
- Notify users on outdated CMS
- Restore a file
- Blacklist a file
- Whitelist files
- Start manual files scan
- Exclude domain from bot attack and captcha check
- SRBL - Whitelist domain or sender IP Address
- Enable Ioncube in cPanel PHP
- Grant server access to support
- How to fix the agent error in App Portal
- Whitelist a WAF rule ID
- Run a hook script after file detection
- Whitelist a user in the scanner engine
- What is inotify watch and how will it affects server performance
- Migrate license to a new server or IP Address
- Tagging Servers
- How to install cPGuard Standalone
- How do we calculate the number of users on a server
- Add additional directories to automatic scan list
- cPGuard WAF required settings and depencies
- So many cpguard-job-logs::fetchlogs processes running
- Install ModSecurity with Nginx on CentOS/RockyLinux/AlmaLinux
- How to install latest ModSecurity 2.9.7 with Apache - Install ModSecurity 2.9.7 with Apache
- How to whitelist an IP address
- How to report a file?
- Block PHP script upload using cPGuard WAF
- cPGuard License abuse is detected
- Webuzo Security using cPGuard - Webuzo Antivirus - Webuzo Antimalware
- Block countries from accessing your websites and server
- Import and export cPGuard configuration
- Customising/Branding the email Templates (user emails)
- Show all articles ( 17 ) Collapse Articles
-
General
- Migrating cPGuard V3 to V4
- Uninstalling cPGuard
- Overriding WordPress cron job
- Install ModSecurity with Nginx on Debian/Ubuntu
- How do we calculate the number of users on a server
- How to install latest ModSecurity 2.9.7 with Apache - Install ModSecurity 2.9.7 with Apache
- Bulk Action - Run an action against multiple servers
- How to whitelist an IP address
- How to report a file?
- Block PHP script upload using cPGuard WAF
- cPGuard License abuse is detected
- Request body excluding files is bigger than the maximum - Request body no files data length is larger than the configured limit
- Block countries from accessing your websites and server
- Import and export cPGuard configuration
- IPDB Error ::(nf_tables): table `filter' is incompatible, use 'nft' tool
-
Change Logs
-
Standalone
- cPGuard Standalone Configuration
- How to modify standalone configuration file cpguard.ini
- How to install cPGuard Standalone
- How to secure the websites on a Webmin/Virtualmin server using cPGuard
- Install ModSecurity with Nginx on Debian/Ubuntu
- Secure websites on Control Web Panel / CWP Server
- Installing cPGuard on Enhance panel
- How to install latest ModSecurity 2.9.7 with Apache - Install ModSecurity 2.9.7 with Apache
- Secure websites on Interworx Control Panel
-
Standalone Panels
-
WAF
- cPGuard WAF required settings and depencies
- Install ModSecurity with Nginx on Debian/Ubuntu
- Whitelist a WAF rule ID
- WAF Integration
- Web Application Firewall
- Install ModSecurity with Nginx on CentOS/RockyLinux/AlmaLinux
- How to install latest ModSecurity 2.9.7 with Apache - Install ModSecurity 2.9.7 with Apache
- Block PHP script upload using cPGuard WAF
- Request body excluding files is bigger than the maximum - Request body no files data length is larger than the configured limit
- What is Proxy IP Check in WAF
- Debug WAF blocking
-
cPGuard X
Bulk Action – Run an action against multiple servers
5 out of 5 stars
1 rating
| 5 Stars | 100% | |
| 4 Stars | 0% | |
| 3 Stars | 0% | |
| 2 Stars | 0% | |
| 1 Stars | 0% |
The App Portal of cPGuard helps to view and manage multiple servers from a single interface. The App Portal also provides an option to apply changes to multiple servers in a go. Thi is enabled through the “bulk actions” menu which is available the server lisiting page as given below.

Once the bulk action is chosen, you will have to choose the list of servers on which you wish to apply the changes. You can select specific servers or all servers based on your requirements.
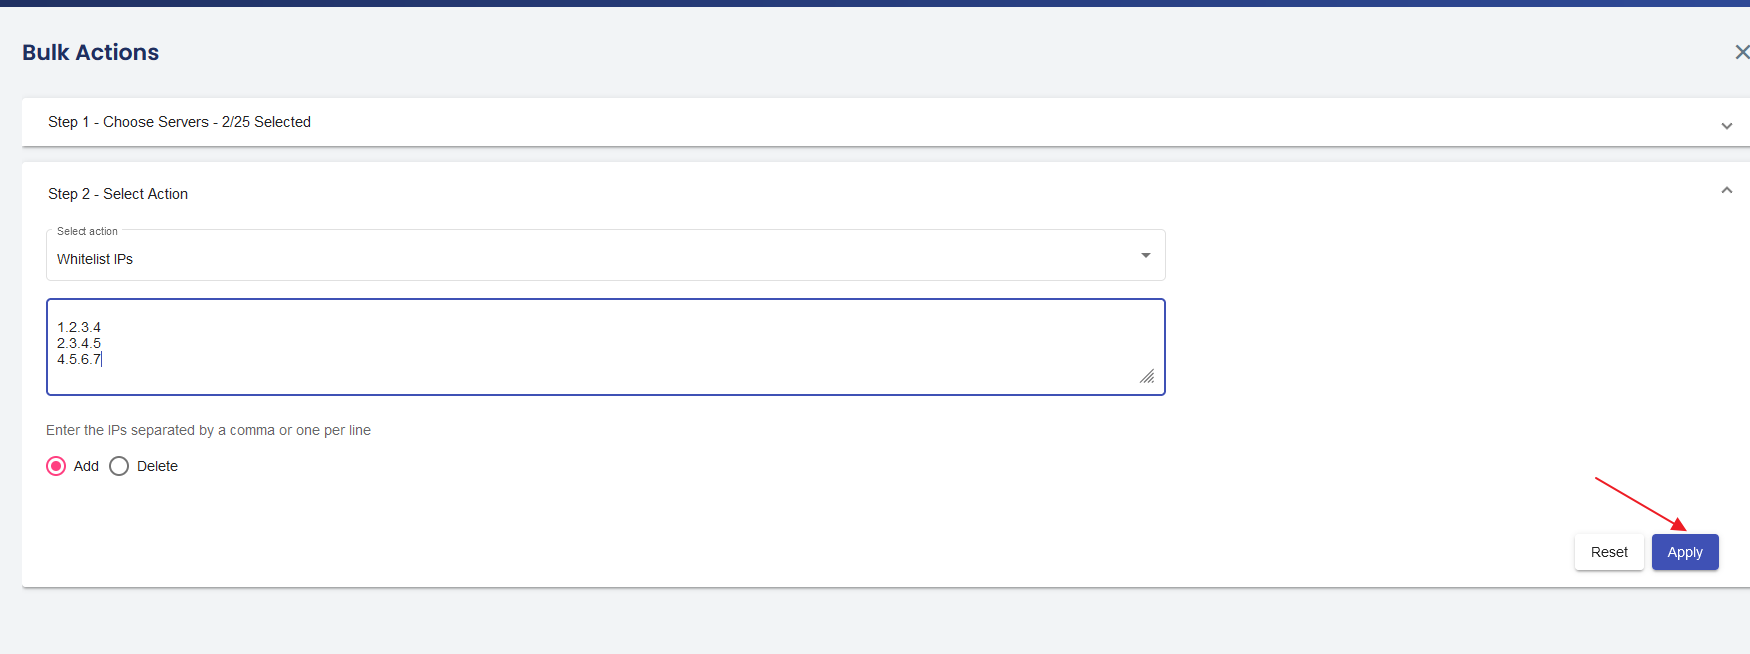
After selecting the necessary servers, you need to choose the specific action that you need to run on the servers. There are a predefined set of actions that are presented in a drop-down box.
You may need to choose the action, provide the input ( IP address, Country name, etc ), and then click on Apply button and that will start applying the changes on the selected servers.

After clicking on the “Apply” button, you can see the progress and the final report on completion.
5 out of 5 stars
1 rating
| 5 Stars | 100% | |
| 4 Stars | 0% | |
| 3 Stars | 0% | |
| 2 Stars | 0% | |
| 1 Stars | 0% |
